This article proposes a simple and easy to understand approach to the fundamentals of OE Databases. Among the objectives of the article is the description of relational database concepts and the steps used in creating and using a database in OpenEdge 12.8.
What?
What is relational database?
OE database is based on the same rules used in the design of relational databases. The database structure, tables, indexes are just a few elements that make up the database schema.
A relational database (RDB) is a way of structuring information in tables, rows, and columns.
An RDB has the ability to establish links—or relationships–between information by joining tables, which makes it easy to understand and gain insights about the relationship between various data points.
Relational databases are based on the relational model. The relational model is a group of rules set forth by E. F. Codd based on mathematical principles (relational algebra), and it defines how database management systems should function. The basic structures of a relational database (as defined by the relational model) are:
- tables – A collection of logically related information treated as a unit. Tables are organized by rows and columns.
- rows – A table is made up of rows (or records). A row is a single occurrence of the data contained in a table; each row is treated as a single unit.
- columns – Rows are organized as a set of columns (or fields). All rows in a table comprise the same set of columns.
- keys – There are two types of keys: primary and foreign.
– primary key – a column (or group of columns) whose value uniquely identifies each row in a table.
– foreign key – a column value in one table that is required to match the column value of the primary key in another table. In other words, it is the reference by one table to another. - indexes – Operates like the index tab on a file folder. It points out one identifying column, such as a customer’s name, that makes it easier and quicker to find the information you want.
What are table relationships?
Database relationships define the connections between different tables within a relational database. In a relational database management system (RDBMS or DBMS), data is structured in tables, and these relationships specify how data in one table links to data in another.
There are three main types of relationships between two tables:
- One-to-One: Each record in the first table has a single, unique related record in the second table.
- One-to-Many: Each record in the first table can relate to one or more records in the second table, while each record in the second table is linked to only one record in the first table.
- Many-to-Many: Each record in the first table can relate to multiple records in the second table, and each record in the second table can relate to multiple records in the first table.
Note: In practice, many-to-many relationships are typically divided into multiple one-to-many relationships by introducing a linking table that connects records across the two tables.
Tables connect through shared fields that serve as common identifiers between them.
What is an ABL Statement?
A statement is a complete instruction to the ABL Virtual Machine (AVM) at run time. A statement is always terminated with punctuation. Usually, this is a period, except for block header statements that end with a colon.
In an ABL (Advanced Business Language) program, the three basic kinds of statements are procedural statements, database access statements, and user interface statements. Procedural statements are used for control flow and logic, database access statements facilitate interactions with the database, and user interface statements manage elements that interact with the user.
Procedural statements in ABL (Advanced Business Language) are used to perform logical operations and control the flow of execution in a program. These statements allow developers to define the behavior of an application through constructs such as loops, conditionals, and variable manipulation. Some common types of procedural statements include:
Assignment Statements: Used to assign values to variables.
DEFINE VARIABLE myVar AS INTEGER NO-UNDO.

myVar = 10.
If-Else Statements: Allow conditional execution of code blocks.
IF myVar > 5 THEN

DISPLAY "Greater than 5".

ELSE

DISPLAY "5 or less".
DO Loops: Used for repeating a block of code a specific number of times or until a condition is met.
DO i = 1 TO 10:

DISPLAY i.

END.
FOR EACH Statements: Used to iterate through records of a dataset.
FOR EACH customer:

DISPLAY customer.name.

END.
PROCEDURE Statements: Define reusable code blocks.
DEFINE PROCEDURE myProcedure:

DISPLAY "This is a procedure".

END PROCEDURE.
TRY-CATCH Statements: Handle exceptions to manage errors gracefully.
DO ON ERROR UNDO, THROW:

/* Code that may cause an error */

CATCH e AS Progress.Lang.Error:

DISPLAY "An error occurred: " e:GetMessage(1).

END.
In ABL (Advanced Business Language), database access statements are used to interact with the database. These statements allow you to create, read, update, and delete (CRUD) data records in the database tables. Here’s an overview of how they work:
FIND: Used to retrieve a specific record from a database table. You can use conditions to specify which record you want to find.
FIND FIRST customer WHERE customer-id = 1000.
FOR EACH: Iterates over a set of records in a specified table, allowing you to perform operations on each record.
FOR EACH customer WHERE city = "New York":

DISPLAY customer.name.

END.
CREATE: Used to create a new record in a specified table.
CREATE customer.

ASSIGN

customer.name = "John Doe"

customer.city = "Los Angeles".
DELETE: Removes a specified record from the database.
FIND FIRST customer WHERE customer-id = 1000 NO-ERROR.

IF AVAILABLE customer THEN DELETE customer.
UPDATE: Modifies an existing record in the database.
FIND FIRST customer WHERE customer-id = 1000.

IF AVAILABLE customer THEN DO:

customer.city = "San Francisco".

UPDATE customer.

END.
INSERT: Adds a new record to a table, similar to the CREATE statement but explicitly indicates that you are inserting a new record.
INSERT customer.
Transaction Handling:
You can manage transactions using START TRANSACTION, COMMIT, and ROLLBACK to ensure data integrity and control over changes made to the database.
Error Handling:
The NO-ERROR option can be used with database access statements to prevent runtime errors from halting the execution of the program, allowing for graceful error handling.
ABL provides a robust set of commands for database access, allowing developers to efficiently manage data within their applications. Understanding these statements and their syntax is essentialfor effective database programming in ABL.
User interface statements in ABL (Advanced Business Language) are used to create and manage the graphical user interface (GUI) of applications. These statements allow developers to define, control, and manipulate user interface elements such as windows, buttons, fields, and menus.
Key Functions of User Interface Statements in ABL:
- Creating UI Elements: Define windows, frames, fields, buttons, labels, and other controls to gather user input or display data.
- Event Handling: Manage user interactions through events, such as button clicks, mouse movements, or keyboard input.
- Layout Management: Organize and position UI components to create an intuitive user experience.
- Data Binding: Link user interface elements to data sources or database fields to display and update information in real time.
- Navigation Control: Implement navigation within the application, allowing users to move between different views or sections.
Examples of User Interface Statements:
– `DEFINE VARIABLE`: To declare variables that may represent UI components.
– `CREATE`: To create GUI components like windows or panels.
– `DISPLAY`: To present data on the screen.
– `ON`: To define event handlers for user actions.
Overall, user interface statements are essential for developing ABL applications that require interaction with users, enhancing usability and functionality.
Why?
The primary advantage of the relational database model lies in its intuitive data organization, which facilitates seamless access to interconnected data elements. This structured approach has made relational databases the preferred choice for organizations managing substantial volumes of structured data, including inventory tracking, transaction processing, and application logging.
Additional benefits of relational databases include:
Flexibility
Relational databases allow the addition, modification, or deletion of tables and relationships with ease, enabling data updates without altering the underlying database structure or impacting existing applications.
ACID Compliance
Relational databases adhere to ACID principles (Atomicity, Consistency, Isolation, Durability), ensuring data integrity and reliability even in the event of errors, system failures, or other disruptions.
Enhanced Collaboration
Relational databases support simultaneous access by multiple users. Built-in locking mechanisms safeguard data during updates, preventing conflicts and preserving data accuracy.
Integrated Security
Role-based access control limits data visibility and access, ensuring only authorized users interact with sensitive information.
Data Normalization
Through a design process known as normalization, relational databases reduce data redundancy, enhancing data integrity and consistency across the database.
How?
How to create a database?
The primary tools used for database creation in OpenEdge include:
– Proenv: A command-line utility that facilitates the execution of various database administration commands and utilities.
– Data Dictionary and Data Administration: These tools provide a graphical interface for performing essential database management and administrative tasks.
In this article, the Data Dictionary tool will be utilized to construct an OpenEdge database.
What is a metaschema?
To create an OpenEdge database, it is necessary to copy an existing database to transfer the metaschema—a collection of internal tables that defines the foundational structure of an OpenEdge database. Metaschema tables, identifiable by names beginning with an underscore (_), are hidden by default in the Data Dictionary. However, you can reveal these tables by navigating to View > Show Hidden Tables in the Data Dictionary interface.

Using the Data Dictionary tool, you can create a new database in several ways:
– An Empty Database: This is a replica of the “Empty” database containing only the metaschema, with no tables or data.
– A Copy of the Sports Database: This option includes tables, fields, and data from the sports database.
– A Copy of Another Database: For instance, duplicating a production database with its tables, fields, and data.
In the following, we will follow visually the steps that must be used to create a database in our project from the Data Dictionary tool.
1. Start the Data Dictionary – there are 3 ways in which this can be achieved, namely:
1.1. Using Windows Program menu
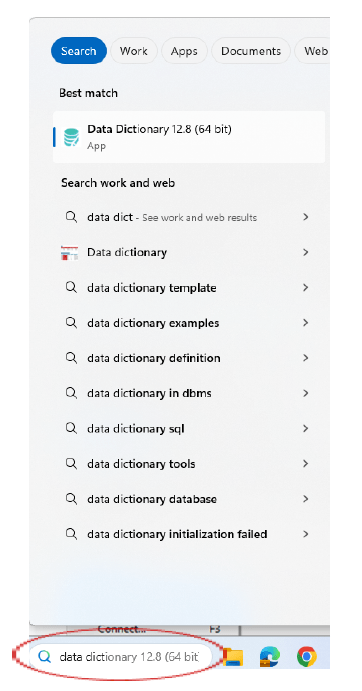
1.2. From the Tools menu, select Data Dictionary

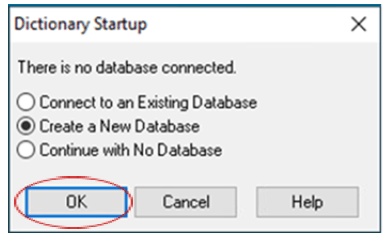
2. Open the Create Database dialog box
2.1. If no database is connected when you start the Data Dictionary, the Dictionary Startup dialog box appears. Select Create a New Database and click OK to access the Create Database dialog.
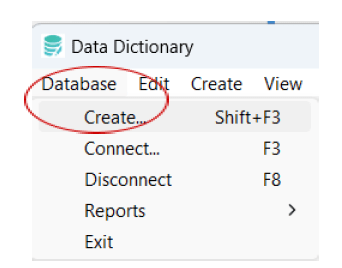
2.2. If a database is already connected, select Database > Create in the Data Dictionary main window to access the Create Database dialog
3. In the Create Database dialog box, perform the following steps:
3.1. In the New Physical Database Name field, enter the complete path of the name of the new database. Alternatively, click Files and navigate to the location where you want to save the database. Then, enter the name of the new database.
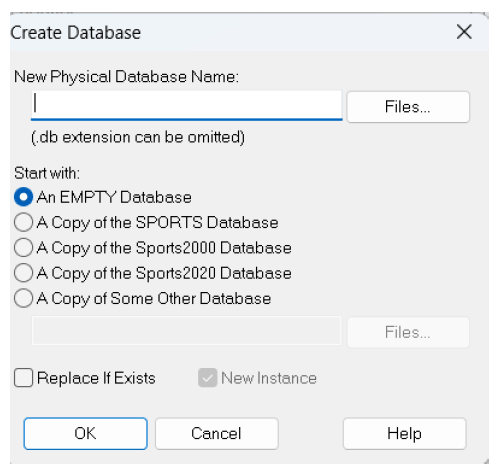
3.2. If you want to create a new database without schema or data, select An EMPTY Database. Alternatively, you can choose to create the new database as a copy of the SPORTS, SPORTS2000, SPORTS2020, or another database in your environment.
3.3. To create the database, click OK, and it will be created at the specified location with many files. Then, the Connect Database dialog box appears.
4. To connect the Data Dictionary to the database, use the database file with the .db extension. In the Connect Database dialog box, perform the following steps:
4.1. In the Physical Name field, enter the complete path and name of the newly created database. Alternatively, you can click Browse and select the database you want to view.
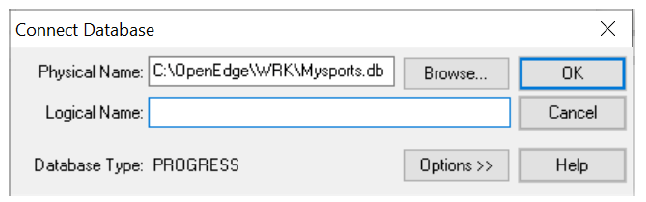
4.2. Select OK.
After connecting the Data Dictionary to the database, you can view and explore different components of the database.
Logical Name
Sometimes, you may have multiple versions of the same database with different names.
Each database can have a unique physical name while a logical name links each one to the master database.
To update database contents, you only need to modify and recompile the master database instead of each individual version.
When connecting to a database, specify the physical name and location, and optionally use a logical name for easier reference.
SPORTS2020 database
The Sports2020 Database document outlines the structure of the sports2020 database for use in this course. It serves as a reference for demonstrations and exercises, covering:
– Table relationships, including shared fields
– Database triggers and procedure file locations
– Available sequences
– Sample Data Dictionary reports
Database management in Data Dictionary
Data Dictionary thus becomes an easy-to-use tool used for managing databases. Through it, the user has access to the following elements of the database:
– databases – View and manage multiple databases, including their properties and relationships. The Data Dictionary helps track database versions, permissions, and settings for a centralized view.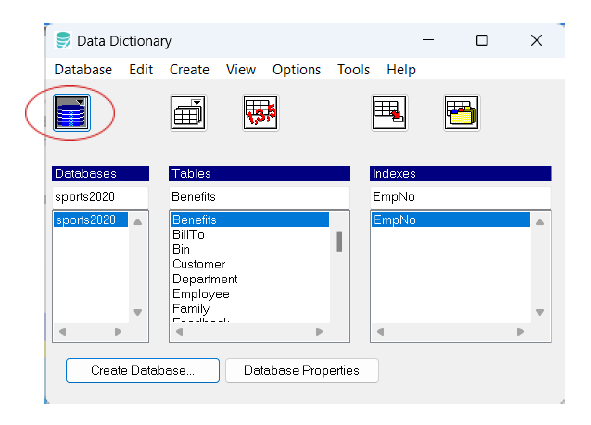
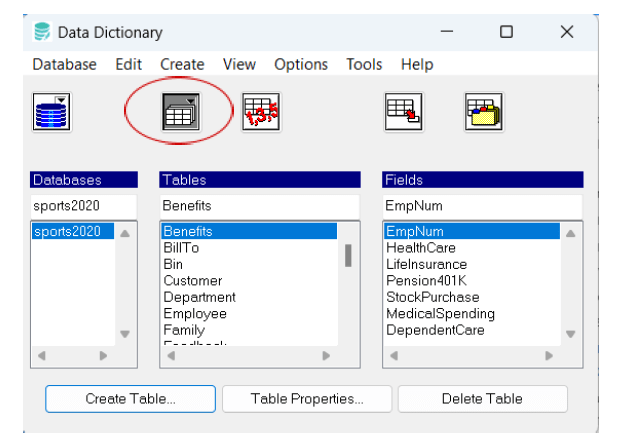
– tables – Access all database tables, view their structure, and modify them as needed. You can view relationships between tables, edit columns, and manage constraints, making it easier to update and organize data.
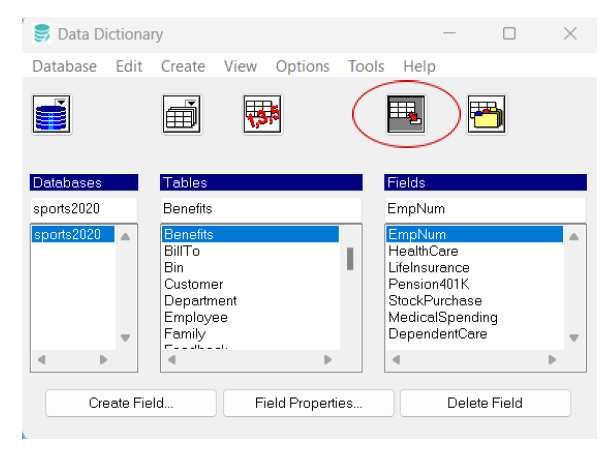
– fields – Explore and edit individual fields (or columns) within tables. The Data Dictionary allows you to change field properties (such as data type and size), add default values, and apply validations to ensure data consistency.
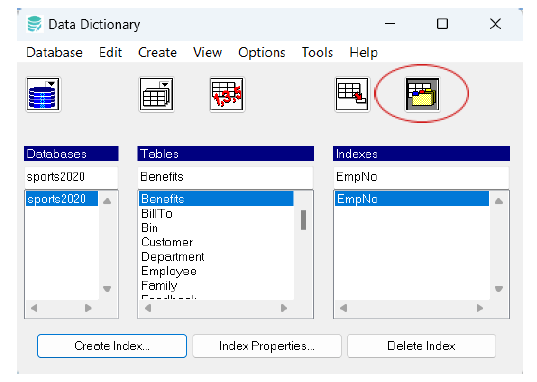
– indexes – Access and manage indexes on tables to improve query performance. The Data Dictionary enables creating, viewing, and updating indexes to speed up data retrieval for commonly searched fields.
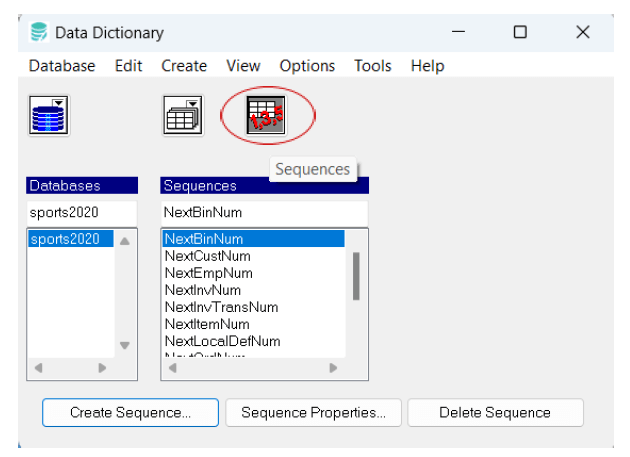
– sequences – Manage database sequences, which are typically used for auto-generating unique values (such as primary keys). The Data Dictionary allows for creating, viewing, and modifying sequences, helping to maintain order and uniqueness across tables.
Conclusion
In conclusion, OpenEdge Databases offers a robust and intuitive framework for managing and organizing structured data, leveraging the principles of relational database design. Through features like ACID compliance, data normalization, flexible table relationships, and robust security, OE databases support reliable data integrity and accessibility. Tools such as the Data Dictionary and Data Administration enhance usability, enabling straightforward creation, modification, and administration of databases. This makes OpenEdge a valuable solution for organizations requiring scalable, secure, and efficient data management, capable of supporting both routine operations and complex data-driven applications.

Author: Diana Serban, Junior Developer
She is a dedicated and responsible individual, always ready to lend a helping hand. Her motivation and reliability make her a trusted presence in any team or project she undertakes.