Introduction
Progress OpenEdge is a powerful application development platform for building, deploying, and managing business applications. OpenEdge provides a range of specialized tools that improve efficiency, optimize workflows, and help developers build safe, scalable, and effective applications.
This article covers essential tools of OpenEdge, including the Procedure Editor, Data Dictionary, and Progress Developer Studio for OpenEdge. Each tool plays a unique role in the development lifecycle, from coding and debugging to database management and web service development. Below, we will cover what each tool does, why it is needed, and how can we use it in application development.
Procedure Editor
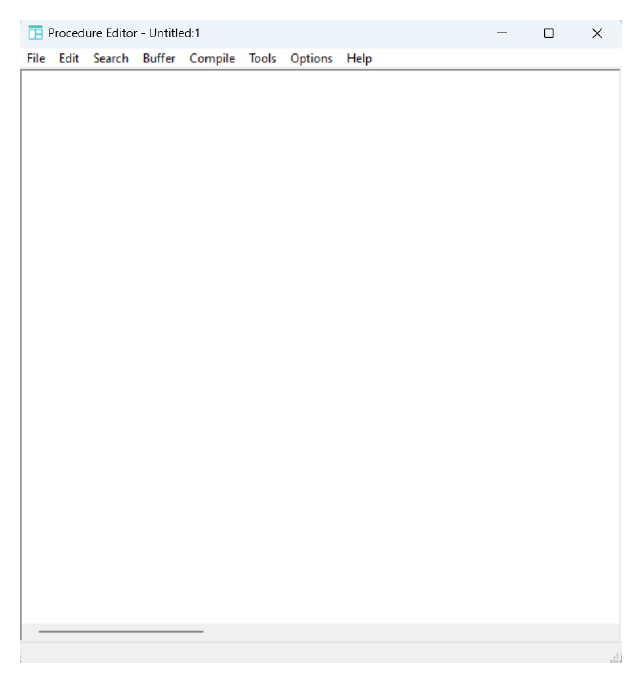
The Procedure Editor is a tool for writing, compiling, and testing ABL (Advanced Business Language) code. It enables developers to easily create and manage procedures, functions and triggers. This editor is essential for developing applications, particularly in defining business logic and processing rules within the Progress OpenEdge environment. Users can input and run ABL code, troubleshoot errors and access tools like the compiler or even Data Dictionary. The Procedure Editor can be opened from Progress Developer Studio for OpenEdge or from the Windows Program menu, and it consists of a text editor and a menu.
Create and run a procedure
You can create or open new files and procedure windows, as well as save them from the File menu tab. For now, we will write a simple procedure in the already opened file.
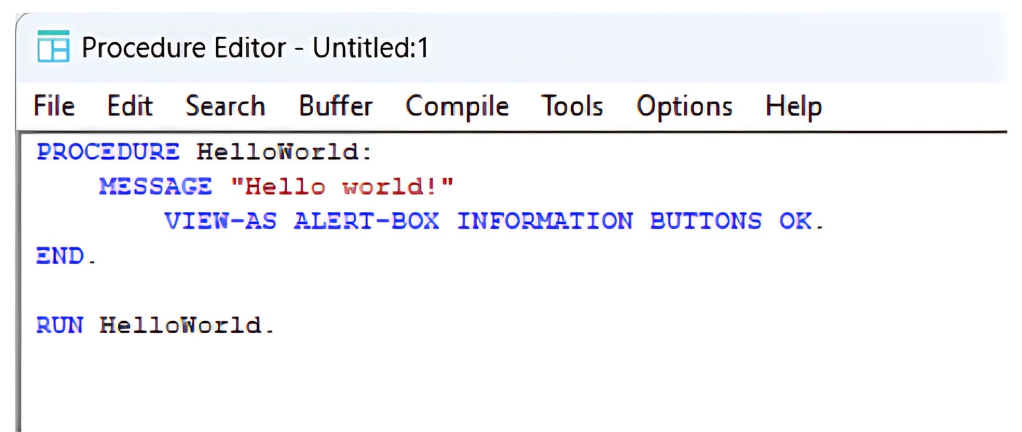
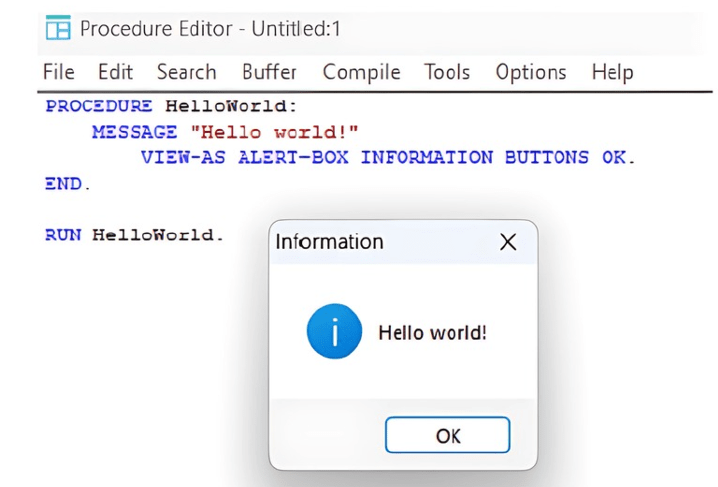
We can observe that the keywords are highlighted and we can activate auto completion by clicking CTRL + Space. Go to Compile > Check Syntax to make sure the code syntax is correct, and then select Compile > Run to run our code.
Connect to a database
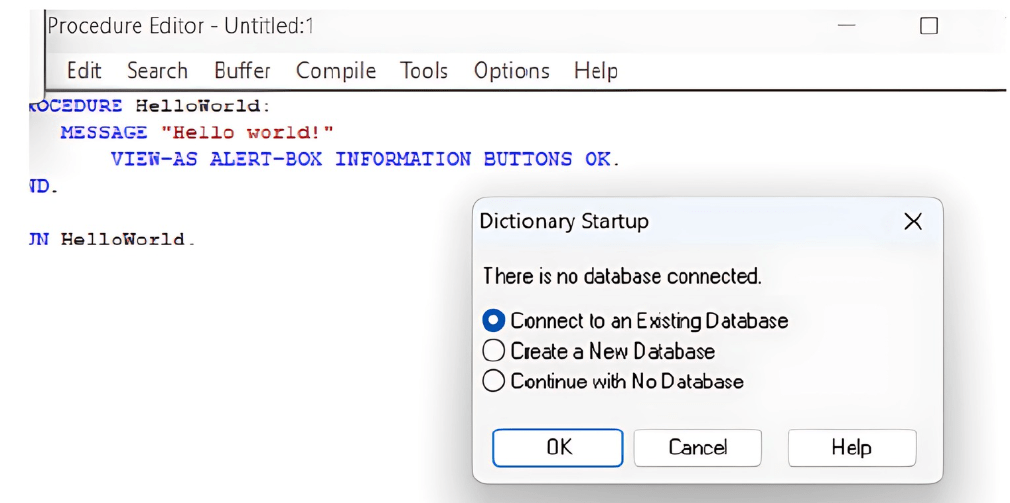
Connect to a database by accessing Data Dictionary from Tools > Data Dictionary. To see a complete guide on how to connect to a database using Data Dictionary, go to section 3 of this article.
Data Dictionary
Data Dictionary is a tool used to define and manage database schemas in Progress. It allows developers to create and modify tables, fields, indexes, triggers, sequences and other schema components directly within a database. It is an important tool in managing the structure of a database, ensuring data integrity and facilitating effective data retrieval.
When opening the Data Dictionary, we must select an option from the Dictionary Startup window to access the main functionalities.
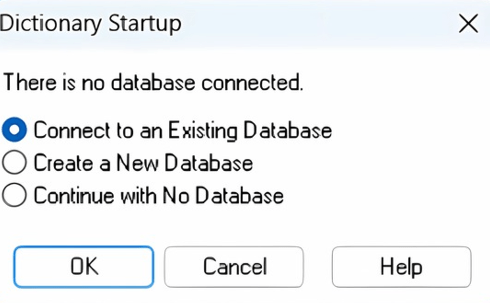
Create an empty database and connect to it
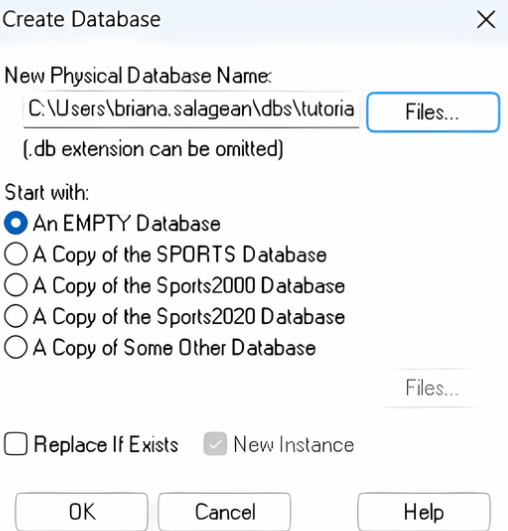
We will now create an empty database, at first by selecting the “Create a New Database” option. After pressing OK, the Create Database window opens, and we can provide a physical name for our database, and make sure that “An EMPTY Database” is selected.
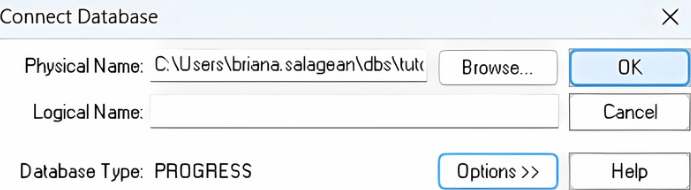
Once our database is created, we must connect to it, and for now only click OK on the Connect Database window.
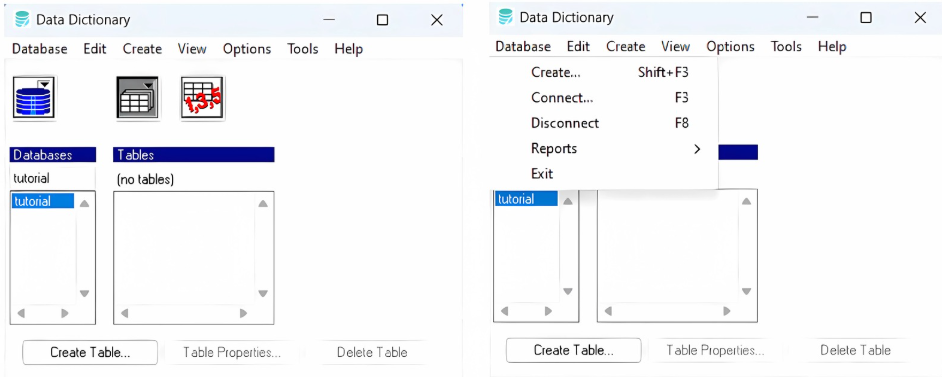
After creating a new database and establishing a connection to it, we can now manage it from the main window of Data Dictionary. We could have also opened the Data Dictionary without connecting to a database and use the Database tab of the menu to perform any of the actions shown previously.
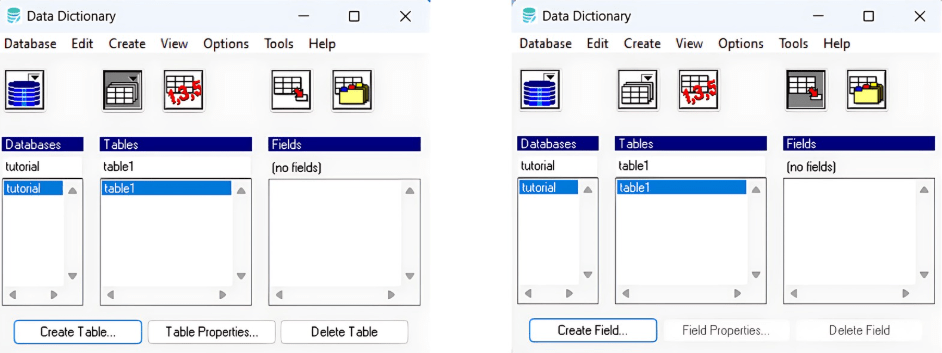
Define and manage tables
In the Tables perspective (second column) we can see that the database is empty and we do not have any tables, to create one select the tutorial database and press Create Table. Add a name for your table in the Create Table dialog and click Create. You can also use this dialog to add triggers to your table.

Coming back to the tables perspective – by clicking the leftmost icon above the Tables column – we can add fields and indexes to this new table. We can also modify a selected table by pressing the Table Properties button, or delete a table using the Delete Table button.
Define and manage sequences
For a database you can also manage sequences. To create a new sequence, you must select the sequences perspective which is the rightmost icon above the second column, and click Create Sequence. The Create Sequence dialog opens and you can now name your sequence, set initial, incremental and limit values. When you are finished click Create. You will now be able to visualize the NEXT-ID sequence in the designated column.
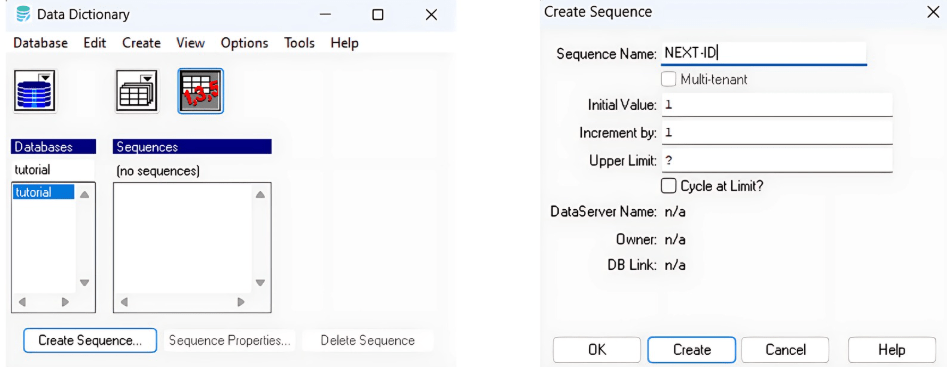
After creating a new sequence, when selected, the buttons Sequence Properties and Delete Sequence should be enabled and allow for modifications over the sequence.
Define and manage fields
To add a new field, click on the fields perspective – the leftmost icon above the Fields column – and click Create Field.
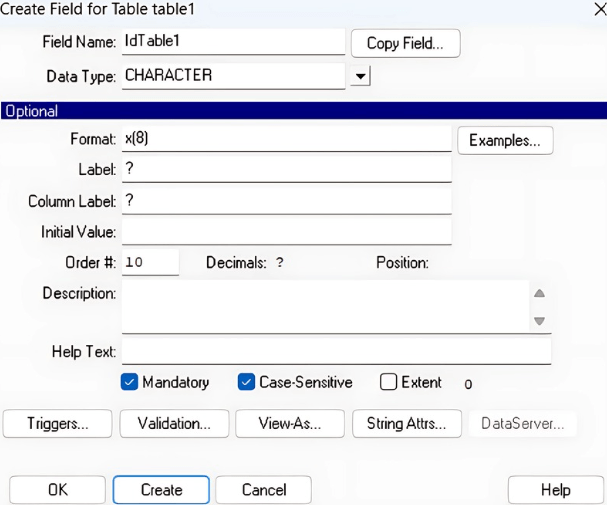
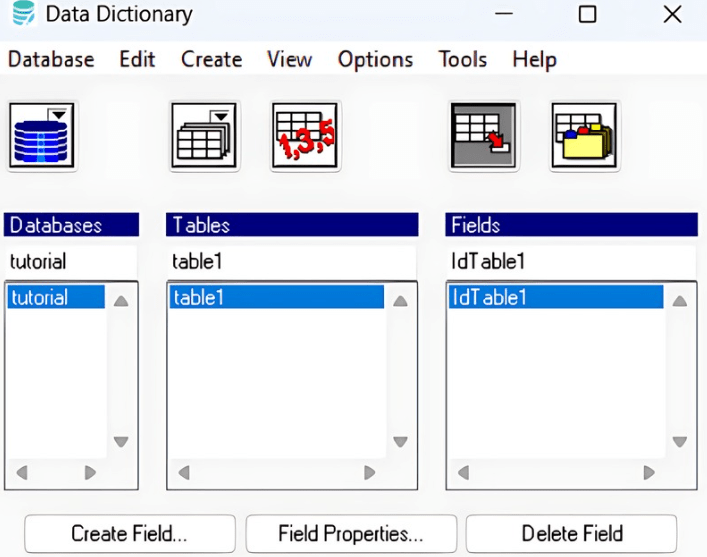
A Create Field dialog should be now open and you should be able to set a name for this field as well as data type, format, labels, initial value, descriptions or constraints such as Mandatory, Case-Sensitive and Extent. You can also set triggers for each field of the table. When you are done setting up your field, click Create and visualize it in the Fields column. For now, we will create an id for our table, that is character, mandatory and case-sensitive.
By selecting a field from the Fields column, you can modify it using the Field Properties button – that opens a dialog like the one in which we created the field – or delete it by pressing the Delete Field button.
Define and manage indexes
If you would like to create a new index for your database, click the indexes perspective – the rightmost icon above the Fields column and press Create Index.
A Create Index dialog is now open and you can set the name, description, the field on which you want to create the index, and constraints such as primary, active, unique, word index, abbreviated, ascending or descending. We will create a primary, active, unique index for the IdTable1 field. When you are done setting up your index, click Create and visualize it in the Indexes column.
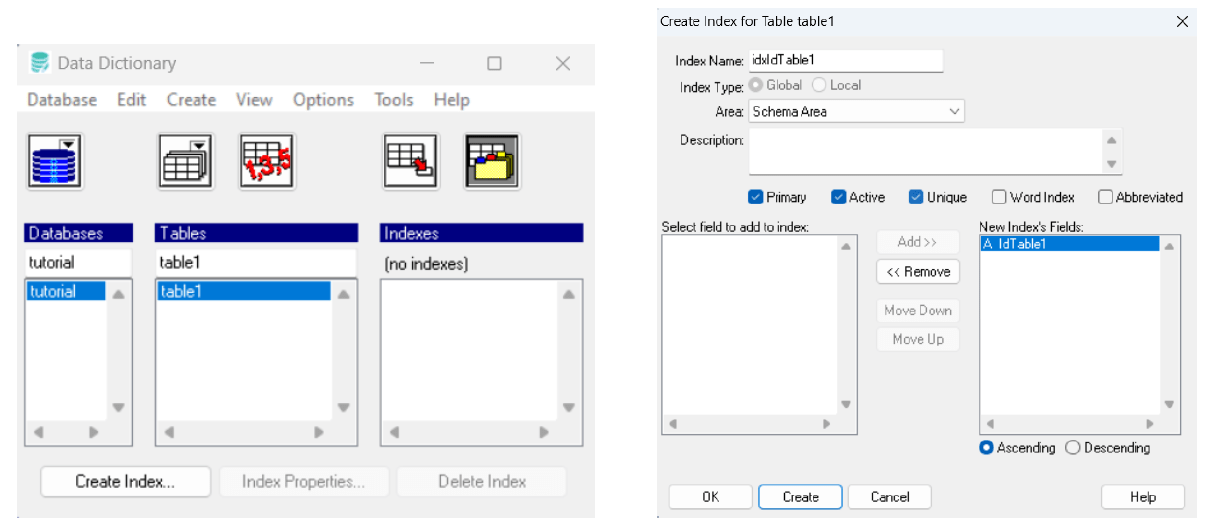
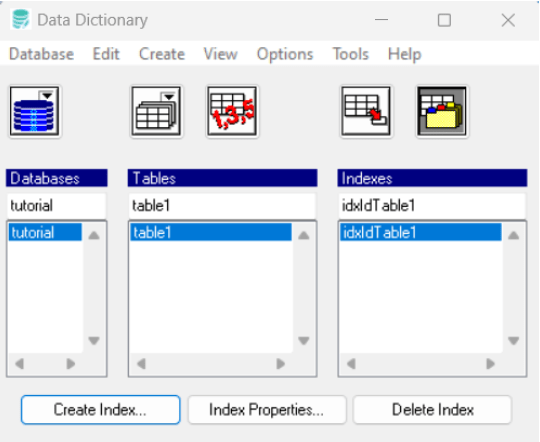
Click on Index Properties to modify a selected index or Delete Index to remove it.
Data Dictionary menu
Use the Create menu tab to create all of the entities shown previously. Use View > Show Hidden Tables to view the metaschema of the database. Switch through perspectives using the Options menu tab. Open additional OpenEdge tools such as Data Administration, Web Tools and App Builder using the Tools menu tab.
Progress Developer Studio for OpenEdge
Progress Developer Studio for OpenEdge is an Eclipse-based integrated development environment for ABL developers that enables you to create, test, debug and integrate OpenEdge applications.
The primary advantage of PDSOE (Progress Developer Studio for OpenEdge) is its ability to streamline the development of complex, database-driven applications by supporting the full application development lifecycle. It enables developers to maintain a modular approach by separating business logic from UI, that can be deployed together and run on a Progress Application Server (PAS).
You can use Developer Studio to visually model your application, develop code in a variety of programming languages, use language-specific editors, debug and test your application and manage OpenEdge servers.
Create a new workspace and manage preferences
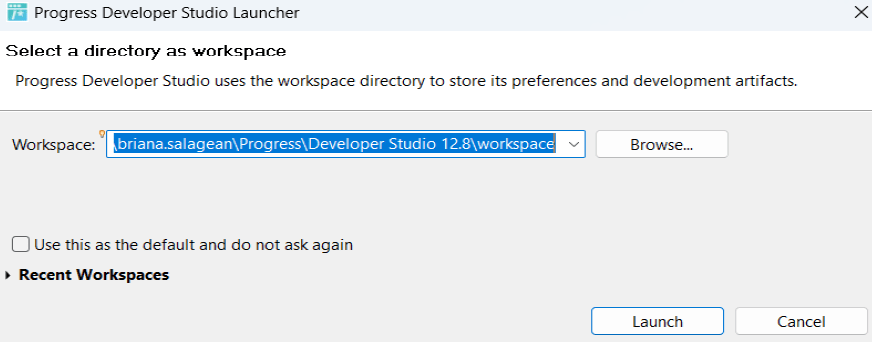
When launching PDSOE, the first step is to set up a workspace by choosing a local folder as its destination, that is where all files related to your application will be placed. Once you select your workspace directory, click Launch.
When a workspace starts for the first time, the welcome page appears. Take a look at the links on the welcome page, if you want to learn more about Developer Studio. If you want to continue to the workbench for your workspace, click the Workbench link.
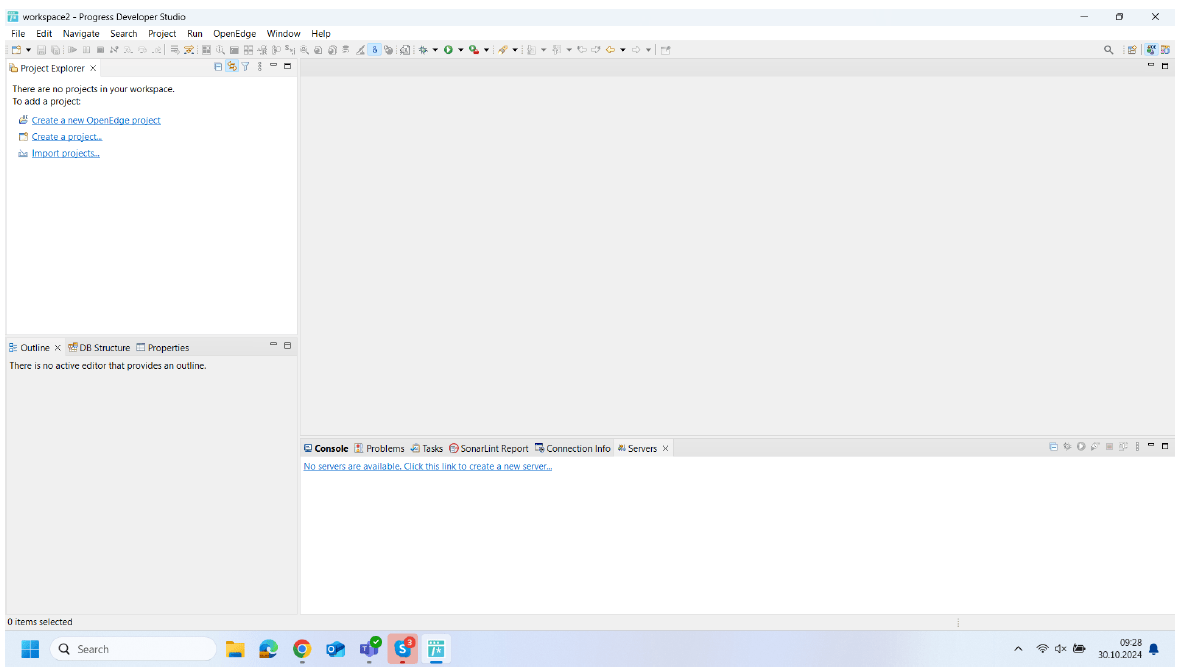
This is a new workspace, so it has no projects. Before adding a new project, we will modify a few workspace preferences. Many of the preferences you configure for the workspace are inherited by the contained projects. You can modify workspace preferences by selecting Window > Preferences from the top menu as shown below.

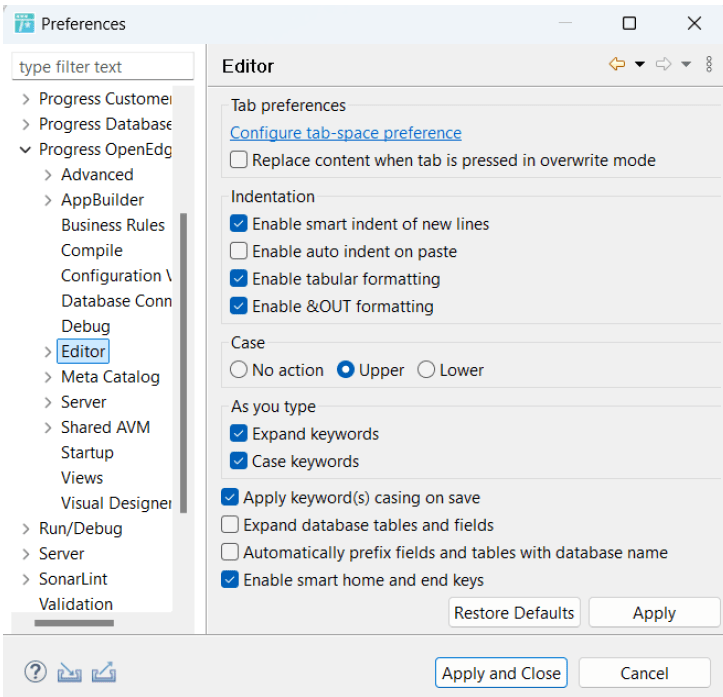
By selecting Progress OpenEdge > Editor, you can change code style preferences.
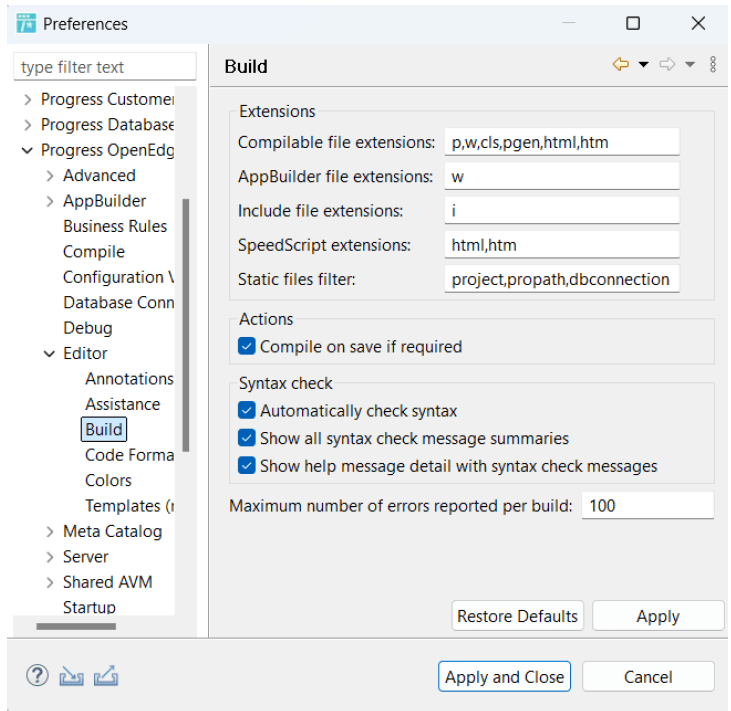
There are settings you can change that can help you with ABL syntax. You can access them from Progress OpenEdge > Editor > Build.
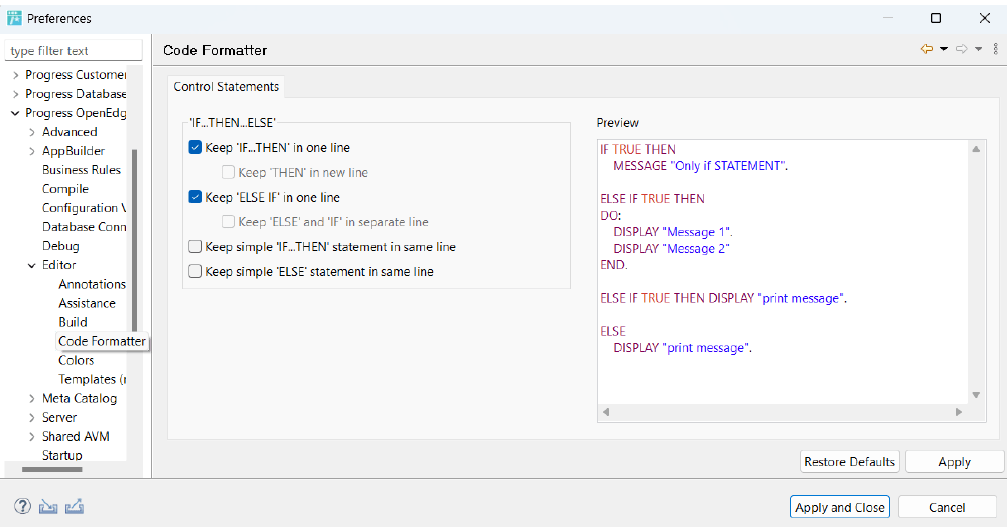
Set code formatting options for ABL code from Progress OpenEdge > Editor > Code Formatter.
Another useful setting for developing and debugging is to display line numbers in your ABL code. Display line numbers by navigating to the General > Editors > Text Editors area and selecting Show line numbers.
Create a new project
Now that we have set our workspace preferences, we can add our first project and start development. To add a new project, you can either click the Create a new OpenEdge project in the Project Explorer tab, or go to File > New > OpenEdge Project. A new dialog for project creation will open, as shown below.
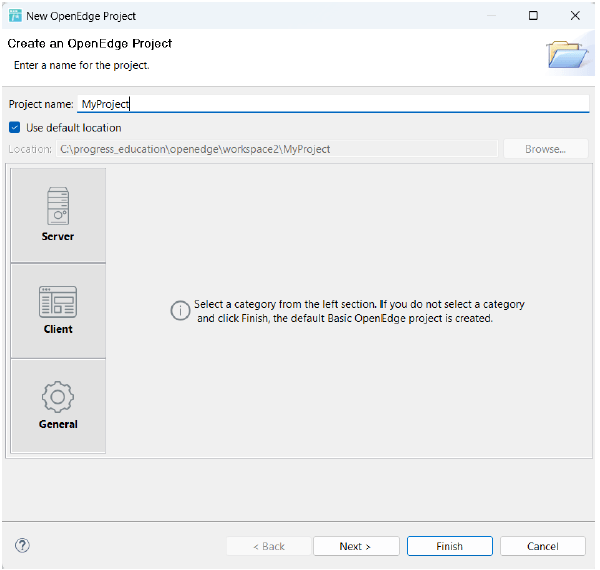
Provide a name and location for your project. You can choose to locate your project inside or outside of the workspace, and you can also select a category for this project. For now we will create a default Basic OpenEdge project in the default location. Click Next to continue the configuration.
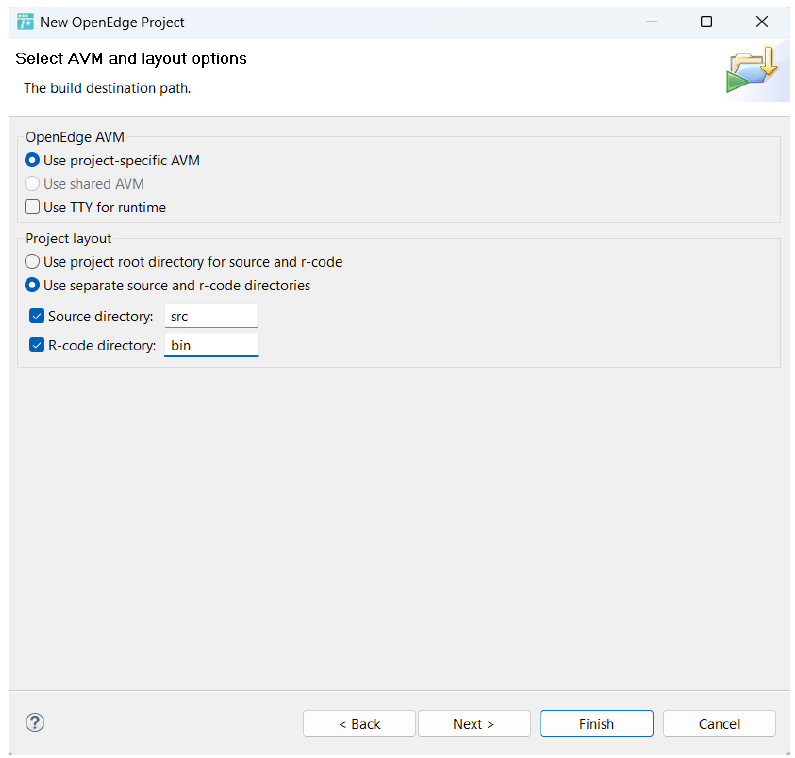
In this dialog you can select the AVM (ABL Virtual Machine) and layout options, along with the build destination path. For now we will use a project-specific AVM and separate source and r-code directories. If you click Next you will be able to configure the project PROPATH and add a database connection, but for now click Finish, as we will set them up later.
Modify the PROPATHs of a project
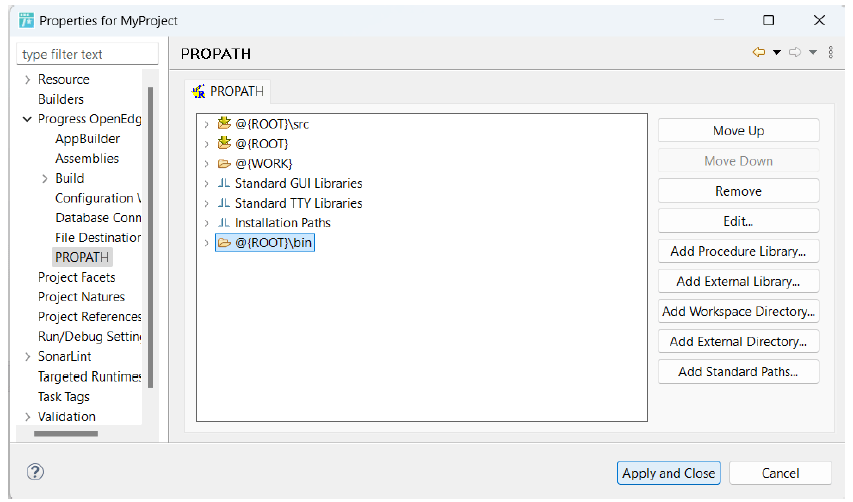
To add to the project’s PROPATHs, right click the New project from the Project Explorer view, then select Properties > Progress OpenEdge > PROPATH. Use the Add Workspace Directory button to add the src and bin folders to the PROPATH, when you are done click Apply and Close.
Set up a database connection
Next we should configure a database connection for this project. Firstly, open the Proenv command prompt and start a database server for your connection. We created the tutorial database in the Data Dictionary section of this article, so we will use it further. The general command would be proserve <db-name> -H localhost -S <port-number>, in our case db-name will be the physical path to the tutorial.db file. After starting the database server, right-click the project and select Properties > Progress OpenEdge > Database Connections, the list should be empty. Click on Configure database connections > New. Now write the data corresponding to this connection as shown below.
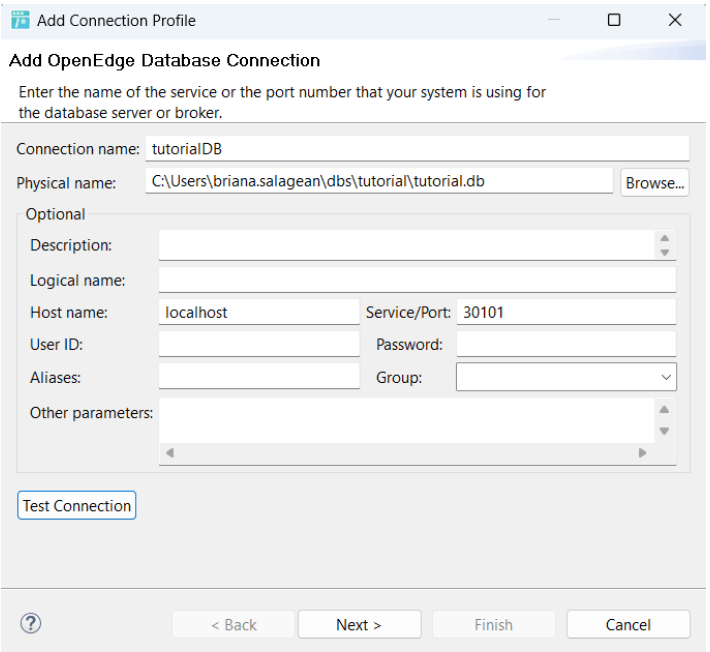
The port number should be the same as the one used when running the preserve command. Make sure that you test the connection before moving forward (click the Test Connection button). Click Next, and uncheck Define SQL Connection, as it is not necessary for this tutorial. Click again Next and check that the connection data is correct. Finally, press on Finish, you should now be able to visualize your database connection in the Database Connections section.
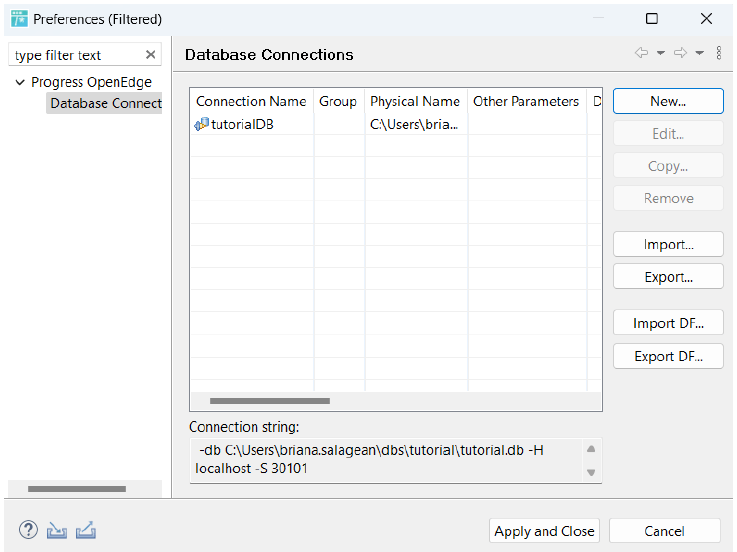
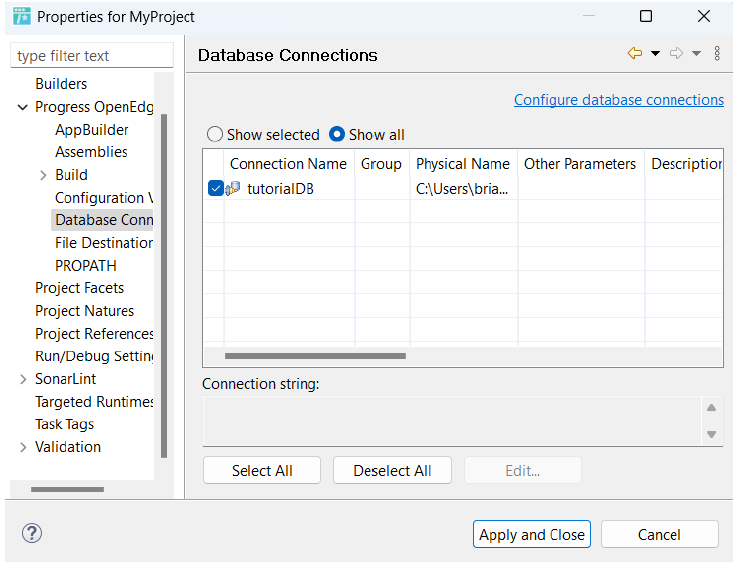
Click Apply and Close and now you will see a new database connection. Select Show all, check the tutorialDB connection, and click again Apply and Close, now your connection is ready.
Other useful functionalities from the PDSOE menu
The OpenEdge Editor perspective is used to develop and test ABL code, this is usually the default perspective when opening PDSOE. If you want to open more views in this perspective, go to Window > Show view. The DB Navigator perspective is a tool for managing the schema of any SQL-compliant database, including OpenEdge databases. You can also create, update and delete tables, columns, indexes and other database objects, but you cannot perform administrative tasks, like dumping and loading data. You can launch this perspective from Window > Perspective > Open Perspective > DB Navigator.
Create new projects, import/export projects and workspace preferences from the File menu tab.
Open other tools such as the Procedure Editor from OpenEdge > Tools > Procedure Editor or Data Dictionary from OpenEdge > Admin > Data Dictionary.
Conclusion
In conclusion, Progress OpenEdge offers a complete set of tools that simplifies business application development and management. By guaranteeing data integrity and accessibility, the Data Dictionary facilitates effective database design and maintenance. The Procedure Editor supports the development of complex business logic, being a fundamental tool for writing and testing ABL code. Lastly, Progress Developer Studio for OpenEdge (PDSOE) offers a modern, Eclipse-based environment that enhances productivity by combining development, debugging, and deployment features.
Together, these tools support the full lifecycle of OpenEdge application development, from database structuring to advanced coding and testing, enabling developers to build reliable, scalable solutions efficiently.

Author: Briana Salagean, Junior Developer
Briana is a talented developer who brings both fun and organization to everything she does. Passionate about travel, reading, and staying active, she’s always seeking new experiences and personal growth. With Atomic Habits as her favorite book, she embraces continuous improvement—both in coding and in life.